Montaggio del raffreddamento a liquido: guida pratica passo passo
Scopri come installare correttamente un AIO con preparazione, radiatore, pompa e collegamenti critici.
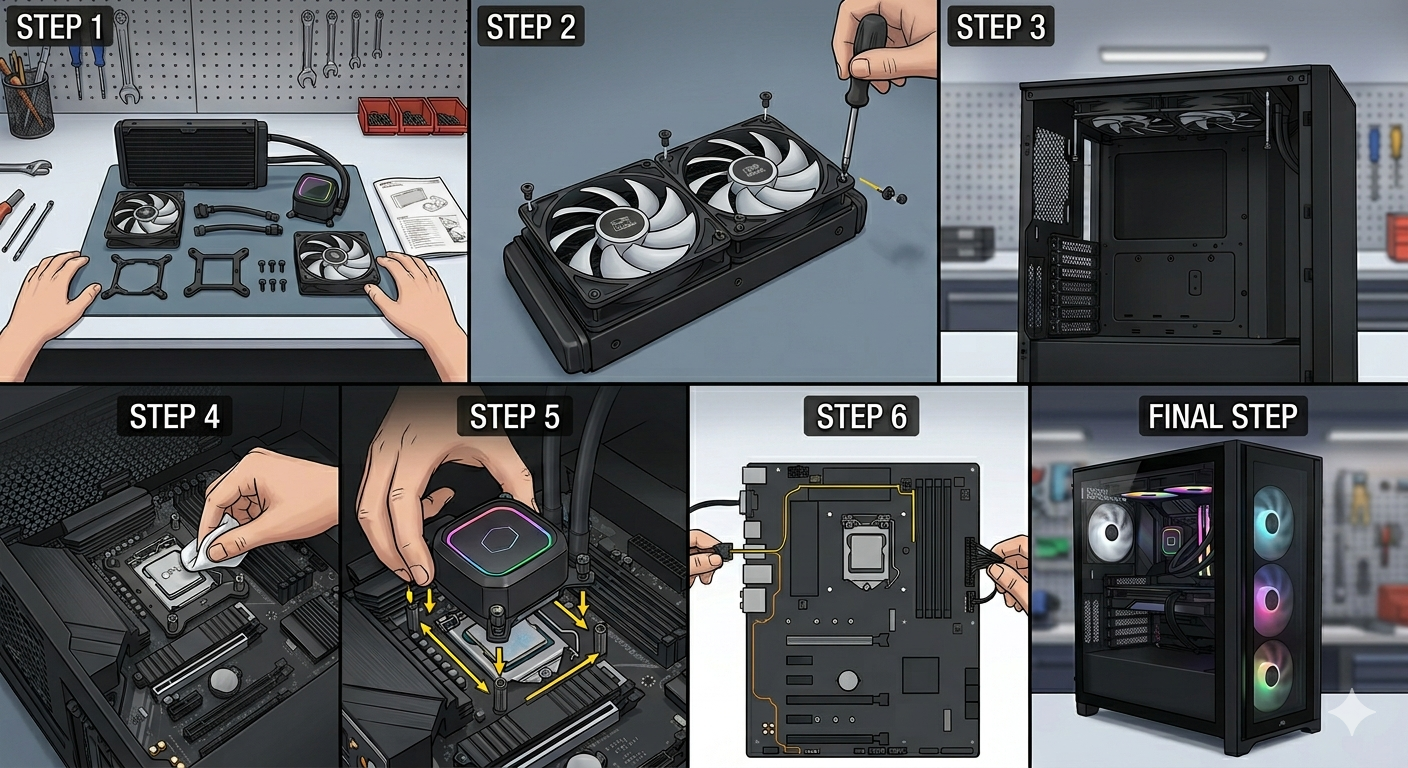
1. Preparation and Parts Check
- Before installation, identify the correct mounting bracket for your motherboard platform (Intel or AMD).
- If replacing an old cooler, clean the old thermal paste from the CPU heat spreader using isopropyl alcohol.
- Plan radiator position first: top mount is generally best, while front mount is a common alternative.
2. Mounting Fans to the Radiator
- Installing fans on the radiator before mounting it in the case usually makes assembly easier.
- Check airflow arrows on each fan. Air typically enters from the open side and exits from the grille/label side.
- For top-mounted radiators, set fans as exhaust (push), moving hot air out of the case.
3. Securing the Radiator to the Case
- Align the radiator with mounting holes on the top panel or front bracket.
- Use long screws to secure the fan+radiator+case stack evenly.
- Do not overtighten screws; excessive pressure can damage radiator fins/channels.
4. Pump and Bracket Installation
- Install the included backplate behind the motherboard.
- Attach front standoffs to the mounting points.
- If thermal paste is not pre-applied on the pump base, apply a pea-sized amount at the center of the CPU.
5. Positioning the Pump Unit
- Seat the pump block on the CPU surface carefully.
- Tighten screws in a cross (X) pattern to distribute pressure evenly.
- Make sure tubes do not block RAM slots and are not under extreme tension.
6. Cable Connections (Critical Step)
- Pump cable: Connect to AIO_PUMP or W_PUMP header. If unavailable, use CPU_FAN and set pump speed to 100% in BIOS.
- Fan cables: Connect radiator fans via splitter to CPU_FAN or CPU_OPT.
- RGB cables: If lighting is present, connect to the correct ARGB (5V) or RGB (12V) header.
Golden Rules
- Pump level: Keep the pump unit lower than the highest radiator point to prevent air accumulation in the pump.
- First startup: A brief liquid/gurgling sound can be normal at first boot; it should settle after trapped air moves to the radiator.
Mounting Steps Visual
Use the image below as a quick reference checklist during assembly.